If you need help with your purchase or have a question about this product, contact me, I'll be happy to help you!
Add this product to yourWish list
WarrantyInformation
Fast & Reliable Delivery
across Canada
Returns process
Quick and Easy
Best Online support
+1.877.349.2332
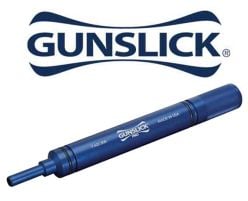
Gunslick Pro AR-10 Bore Guide
Rating:
0%
SKU
52658
Gunslick Pro AR-10 Bore Guide
The Gunslick Pro AR-10 Bore Guide may be the single most important cleaning tool for preserving the long term accuracy of your firearm. This tool keeps the cleaning rod perfectly straight so that it can not make contact with the sides of your barrel. To use this tool, simply remove the upper of your AR-10 style rifle and then pull the charging handle back and remove the bolt carrier group. Remove the Gunslick Pro Bore Guide from its protective cylinder and stretch the two included o-rings over the body of the bore guide. There are two slots at the front and back of the bore guide for the o-rings. Put one o-ring in one of the back slots, and one in one of the front slots. Test the fit by inserting the bore guide into the upper where the bolt carrier group would go. The O-rings can be moved for better fit. Once the bore guide is properly sized, insert it into the upper where the bolt carrier group would normally go. Turn the bore guide so that the port on the side lines up with the ejection port. You can now, add solvents, patches, or other tools through either the opening in the back of the bore guide, or through the port. Insert the rod and cleaning appliance into the back of the bore guide and press it through the bore. This fine tool is made with pride in the USA.
The Gunslick Pro AR-10 Bore Guide may be the single most important cleaning tool for preserving the long term accuracy of your firearm. This tool keeps the cleaning rod perfectly straight so that it can not make contact with the sides of your barrel. To use this tool, simply remove the upper of your AR-10 style rifle and then pull the charging handle back and remove the bolt carrier group. Remove the Gunslick Pro Bore Guide from its protective cylinder and stretch the two included o-rings over the body of the bore guide. There are two slots at the front and back of the bore guide for the o-rings. Put one o-ring in one of the back slots, and one in one of the front slots. Test the fit by inserting the bore guide into the upper where the bolt carrier group would go. The O-rings can be moved for better fit. Once the bore guide is properly sized, insert it into the upper where the bolt carrier group would normally go. Turn the bore guide so that the port on the side lines up with the ejection port. You can now, add solvents, patches, or other tools through either the opening in the back of the bore guide, or through the port. Insert the rod and cleaning appliance into the back of the bore guide and press it through the bore. This fine tool is made with pride in the USA.
 English